Tuesday, November 9, 2010

Liz Mitchell Printmaking Workshop

Last weekend I had the opportunity to take another printmaking workshop, this time with a local artist named Liz Mitchell.  The picture above is a reduction print.  First I carved away the stars and printed with red and orange.  Next I carved away the Northern Lights and printed with blue.  Next I cut away everything but the mountains and printed with black.  We were printing with water soluble block printing ink.  I am not at all happy with the hand of the fabric and I am sure it is not permanent.  But, I believe that after it cures for a couple of weeks, it will be as permanent as it needs to be.  My worry is about stitching through three layers of paint.  Cool, but probably not a great technique for fiber even with different ink.

 I also carved this little bird.  Last summer my husband put a piece of plywood down on our front porch and covered it with bird seed.  What a mess, but so cool.  At any point in the day, there would be up to 20 little birds gathered.  This guy amongst them.  I didn't get any great prints in class.  The one above was about the best.  At home yesterday, I printed some more.  I wasn't happy with the eye and tried to carve it deeper-disaster!!  I destroyed my block.  Luckily I had another piece of linoleum so I recarved him.  The really stupid part is that I carved away the eye again!  Luckily with some E6000 I was able to glue the piece back in.  You can see the results below.  I tend to carve too deeply in the area directly surrounding the subject of the print.  Something to watch for next time.
 Now that I have printed this edition. with a background, I cut away the backgroud and have just the bird to print.  That is where the fun really begins!
These are prints I made with just the mountain that was left from my reduction print.  The contrast on the darker pieces is less than what I would like, but stitching will remedy that.  Now I just have to find an ink that I like.  The oil base ink that I used in the previous workshop I attended is permanent, and has a good hand but is difficult to work with and needs solvents for cleanup.  The water based inks are not permanent, dry very quickly on the plate so you have to work fast, and I don't like the feel of the paint on the fabric.  I have tried Versatex screen printing ink for fabric, and Jacquard fabric paints but they are too thin.  Any suggestions?

Wednesday, November 3, 2010

Holiday Market

The Booth

Silk Scarves

Hats

Beneath the Surface

Seascape

Salmon Spirals

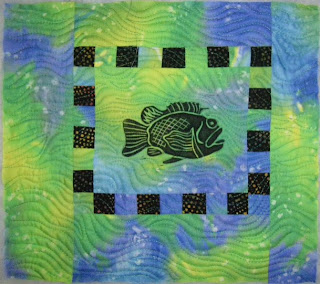
Rockfish

Monday, November 1, 2010

Ornaments

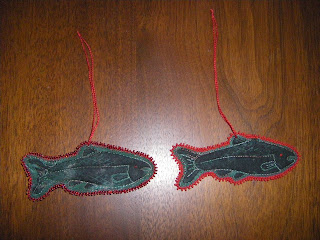
Today, I decided to do something different.  I took out some of my practice fish prints, quilted them, cut them out, then finally did a beaded picot edge on them.  Pretty cute, I think!  I like the one on the right the best-I trimmed closer to the print.

Friday, October 15, 2010

More adventures in Dyeing

Finally I have the time to post pictures of more of the fabric I have dyed.  Dialup is so slow.  Some day we will have a faster connection.  I am pleased with the colors and textures that I am achieving.  I have been dyeing fat quarters mostly, and even with that small amount, I have dyed more than 40 yards of fabric. These fabrics were done with rubber bands. Some are overdyed.  The long piec used aquarium stones and rubber bands.

The three pieces on the left in this picture were wrapped on a piece of rope.  The ladies in the marine supply store, at first thoought it was strange that I asked for 2' of various thicknesses of rope, but were very interested when i told them how I was using it-fellow quiltmakers. The piece on the right was wraped on a pole, held in place with rubber bands.  I have used string and rubberbands. String gets a finer effect, but rubber band are so much easier.

The two blue pieces in this picture were selvage to selvage quarter yards, wrapped on poles diagonally with rubber bands.  I wanted the same texture in two colors.  the middle piece is greener than it appears.  I am happy.  I think the brown piece will make awesome leaves-the vein lines are already there.

Gradations
I have done several gradations.  One thing I learned that if you want to make a similar set of fabrics, you must use the same size of containers. When I did a 12 step rainbow gradation, I didn't have 12 large containers that were the same so I used different ones.  The fabric in the larger containers is pretty solid while the containers where the fabric was more compact, produced a mottled effect.  Both are good, but I wanted them to all be the same.  Of course I made this discovery when I was dyeing full yards.

I have been dying with Pimatex by Kaufman.  I like the finish, and it takes the dye well, but it is a very dense fabric and multiple layers can be difficult to sew through.  I dug out my mothers box of thimbles and put one to use when sewing a binding made from this fabric.  I have a full bolt of Pimatex and 5 yards of Hoffmans PFD , and I ordered some chiffon scarves so next time I want to spend some dyeing time I am ready.  I borrowed a Pullens Pleater from a friend which I plan to use to pleat some fabric and have it ready to go.  If it works well, I will get a pleater of my own, but I am thinking that the pleats will be too regular and that hand sewn pleats might be more interesting.  We shall see.

I have dyed about 60 scarves as well as the cotton fabric.  I figure that if I sell the scarves, it finances my study with dyes.

Wednesday, October 13, 2010

Sunprints with the Grandkids

Here are Truxton and Olivia visiting the Art Show put on by the Art Council.  The three quilts on top in the case are quilts that Olivia, Callista, Truxton and I made together last summer.  The kids did the sun prints and Callista and Truxton, aged 6 at the time, actually sewed on the borders using a Singer featherlight sewing machine that I inherited.  Olivia was only 5 at the time, so she sat on my lap and pretended that she was sewing.  I quilted the pieces, then the kids sewed on the beads.  Unfortunately, I didn't take pictures of the quilts before I gave them to the kids.  Perhaps later.

Thursday, October 7, 2010

Fireweed for Ingrid- Best Small Quilt in the Bearpaw Quilters Annual Show

My quilt, Fireweed For Ingrid, won Best Small Quilt in the Kodiak Bearpaw Quilters Annual Quilt Show!  The show was held last weekend at the Gerald Wilson Auditorium, in Kodiak, AK.  There were many beautiful traditional bed quilts to see.

Thursday, September 23, 2010

Success At Last!

I am a novice dyer.  I had never touched dyes before this summer.  I have dyed lots of fabric. I have gotten some great gradations, but the patterned pieces I have done so far were not anything I could imagine using in a quilt. In fact there have been some pretty ugly pieces. These four pieces started out as boring pieces that bound and overdyed turned into something that I really like.  I think the definate lines of color across the fabric are very interesting.  I dipped half of the previously dyed peice in dye, added soda ash after 10 minutes, the set the other half down and added the other color of dye, followed by soda ash.  I can't wait to do some more!  I have several silk scarves twisted and tied, ready for the next dye day which I think is coming soon, since Nick is headed for Anchorage on Friday, and I can do whatever i want in the house for a few days.  Too bad I have to work!

Friday, September 10, 2010

First Gallery Sale!!

Sea Otters
22" x 42"
Although I have sold many quilts, this is my first sale through a gallery.  My quilts have languished on the walls in a gallery in Anchorage(they sent them back) and at the Artist's Eye, in Kodiak.  I went to see Kerry the other day to show her the silk scarves that I have been dyeing  and she greeted me with the news that my Sea Otter quilt had sold! 

Monday, August 30, 2010

Fireweed for Ingrid completed

Fireweed for Ingrid
I started this quilt last winter at the request of my youngest daughter, Ingrid.  She admired a similar quilt that I had made and asked that I make one for her.  I got stuck on the buds at the top of the stem and the quilt languished for several months.  Then the fireweed started blooming and I figured out how to do the tops with beads.  Today is her 23rd birthday, so I spent the afternoon doing the final stitching.  Happy Birthday, Ingrid!

A closeup of the blooms and the beaded buds at the top of the stalk.

Friday, July 16, 2010

More Evon Zerbetz


These quilts are what I have recently been working on.  I have several prints that are a result of a workshop in may with Alaskan printmaker Evon Zerbetz.  I am using them as a means of experimentation with different techniques.I don't know what I think about this black and red piece.  It was an experiment printing over the fused silk strips.  From a distance, the fish was kindof lost so i made a freezer paper stencil and overpainted with Lumiere bronze paint.  I haven't decided if I saved or ruined the quilt.  I had plans for some button sea creatures and beads on the borders around the foiled star fish.


I really like the quilting on this piece.  The border fabric is one of my first pieces of hand dyed fabric.  The organza shells will be filled with fibers and beads before this quilt is complete.


I am really pleased with the texture I achieved with the quilting on this piece.  Decisions, decisions...The original plan was to couch sea grass like fibers over the top.  I often go over the top with embellishments so am trying to hold back.  Sometimes simple is better.  Of course, all of these need binding or facing, whatever I decide to do.  i generally use binding, but on some of these pieces, I want to try facings, or perhaps a fused and turned false back  on those that I decide to bead or otherwise embelish.

I got Lyric Kinard's DVD in the mail yesterday.  I knew that I needed it!  i have been gathering together various surface design supplies over the last couple of months so it is great to have the visuals for ideas of what I want to make.  My brain is moving in so many different directions that it is difficult to know just where to begin.   While I am thinking and planning, it is great to have this pile of prints to work with.

Monday, June 21, 2010

Evon Zerbetz

Last month i was lucky enough to be able to participate in a printmaking workshop with Evon Zerbetz.  This was the real deal with 2 presses.  She taught the chine colle, a technique using specialty papers to add color to a black and white print.  With Evon's encouragement, I decided to work with fabric the second day of the workshop.  I decided that I wanted to stabilize my fabric with freezer paper during the printing process.  Rather than placing the paper on top of the linocut, she had me put the fabric on the bottom and linocut on top before running it through the press.  I also did some hand printing because I won't have a press to work with if I pursue this technique.  In the workshop, we used oil based printing ink.  It worked fine on the fabric although different fabrics took the ink better than others-silk was the best.  Anyway, this is the first quilt that I have made from my prints.  My daughter Kristin asked to see this quilt thus the reason for todays post!  I cut a large spiral stamp today, and have two smaller ones ready to cut.  Also dyed some more fabric today.  Did a great yellow-orange gradation and got some really nice dandelion pieces.  Having a great time with this, but eventually I need to make something.  I have burned through ten yards of fabric so far.

Friday, June 18, 2010

More Hand-dyes


 This photo is of a 6 step red gradation I did using Fire Red.


I dyed this piece in a pint jar with cobalt blue dye in the bottom and bright yellow on top.


This started as a previously dyed piece of fabric. I sewed sets of concentric circles, and put rubber bands on, as well.

I dyed it in dark green dye and this is what I got.  Dandilions is what it says to me.  I am happy.


Once again, a piece of previously dyde fabric.  I sewed concentric dome shaped lines and left the top without stitching so it would be a more solid color.

I dyed it with cobalt blue dye.  The photo isn't great- there is some detail from the stitching but not enough for all the work.  I think that next time, rather than immersing the peice in dye, I will lay it flat and pour the dye over it and try not to touch it!

Once again, previously dyed fabric.  This time I sewed a section across the fabric that was about 4 inches widebefore the threads were drawn tight and knotted off.
This was also dyed in cobalt blue.  I am happier with this piece.  I was trying for Northern Lights and this definately has potential.

Tuesday, June 8, 2010

reBlog from melanietesta.com: Online class give away.

I found this fascinating quote today:


It is time to drum up awareness of my upcoming Joggles class! Barbara at Joogles and I are giving away one free spot in my Let's Exchange some Art Class, which starts in just two short weeks.melanietesta.com, Online class give away., Jun 2010


You should read the whole article.

Monday, May 31, 2010

Now I have added the forground stalks and leaves.  Next step is to add beads to the background stalks, and to sew on the blossoms.  I am off to Crab Festival to make waffles for Public Radio!  Of course, it is pouring down rain!

Sunday, May 30, 2010

Back to work on Ingrid's fireweed quilt


I started this quilt last Fall, thinking I would complete it for my daughter, Ingrid, for Christmas.  The background was pieced and quilted, and I actually had all of the components laid out on the design wall.  I knew that I wanted to do the buds on top of the stalk with beads.  This is an early summer fireweed-they bloom from the bottom.  by the end of summer, the blossoms are at the top and the lower part of the plant has begun to go to seed.  Anyway,  I had many other projects that I was trying to complete for Christmas, and I didn't want to rush the process with this one so I put it away for a while.  then I spent January and February making little valentine quilts for my loved ones, March took me to Anchorage for the Alaska Fiberfest.  When I got home, I needed to get quilts ready for the Whale Fest Art Show and the Crab Festival Art Show.  I was really procrastinating.  I had gotten so far from the quilt that I didn't know where to start.

This morning I got everything out and got to work.  Here you can see my background stalks fused and sewn to the quilt.  Each flower will eventually have a bead in the center.  Then, I sewed on the foreground stems, and started to sew on the leaves but after I broke two needles, it was time to quit for the day.  The leaves are made of tulle, and I have yoyo style blossoms with bead pistils and stamens.  When I make pieces like this, the back is a mess.  I want the quilting to be the first layer, then I put on the fused pieces, and finally the forground pieces which will be 3-D.  Anyway there is alot of thread!  I put a false back in the piece to cover up the mess and quilt in the ditch with invisible thread to hold the back to the front anywhere that I reasonable can.  How much more quilting does it need at this point?  My quilts hang straight and square so my process must be adequate.  This quilt will have three lines of quilting at the top on the checkerboard section which is below the hanging sleeve which helps with the stability of the hanging sleeve.  I will post an update when I get the rest of the fireweed sewn on.  I still don't have a clear vision of the beaded buds, but it will come to me as I work.

My first hand dyes

These are the first hand-dyes that I have done.  I have a daughter that is a batik artist and I had fantasies of her being my own personal dyer but it has not worked out that way.  She is much to busy.  So, I ordered a beginner's dye kit from Dharma and you can see the results here.  I used only the three primary colors.  I used to can copious quantities of salmon, but I freeze fish these days and you can do anything with frozen fish that you can do with canned fish so canning is a thing of the past and I have lots of pint canning jars so that is what I used for this project.  I really liked using glass because you can see what is going on.  But I can see that I am going to need some larger vessels and that is probably going to mean plastic that you can't see through.  It will really be a surprise!  I love these peices, but I have a hard time seeing myself using such bright colors.  I need to learn how to tone down the colors.  As soon as I was done, I made a new order to Dharma!  Another thing to spend money on!  Just what I need...

Wednesday, May 26, 2010

New Work


Dancing Lady is 24" x 24". I made the jelly fish by sandwiching watersoluble stabilizer(Solvey)and some unfused angelina fiber, for a little sparkle, between layers of tulle which were then place in a hoop, then free motion stitched. The tenacles are made from handdyed ribbon yarn, which are loosely stitched on, and strands of beads.
This quilt and the following two quilts were begun by sewing strips of the background fabrics together. I then cut slightly turned squares from the resulting fabric, and sewed the squares back together. I think it adds alot of interest to the quilts.


"Square Dancers" is 21.5" x 27". The jelly fish are made the same as for Dancing Lady. The quilting isn't very visable in this photo, but I love the texture I achieved. It was the first time I have used wool batting, which contributes to the great texture.


"Rockfish in the Kelp Patch" is 21.5" x 27". The rockfish were made in a similar fashion to the jelly fish but made using orange organza. Seaweed is made from various couched fibers. The seaweed in the borders is pieced in using Carol Taylor's technique of sensuous lines. In the picture above you can see a closeup of the fish.


"Treasures" is 16" x 16". The clam shell is made from white organza, again, with angelina and water soluble stabilizer sandwiched between and placed in a hoop for free motion stitching.


Monday, May 3, 2010


These are my most recent quilts, made for a local Art Show to benefit Whale Fest, a celebration of the return of the Gray Whales to Kodiak Island. I took workshops with Carol Taylor in March, and these are my first attempts at the new techniques that I learned.

LinkWithin

Related Posts Plugin for WordPress, Blogger...